Build package
Build ALOHA
Stanford (Tony Zhao et al.) · Arm · research · 2023
Low-cost open-source bimanual teleoperation system with two leader and two follower arms plus four cameras, used to collect data for ACT imitation learning.
Build is partial: The original build uses Trossen ViperX 300 / WidowX 250 6DOF arms, which Trossen has discontinued. Trossen now sells ALOHA kits (Stationary, Mobile, Solo) on newer hardware.
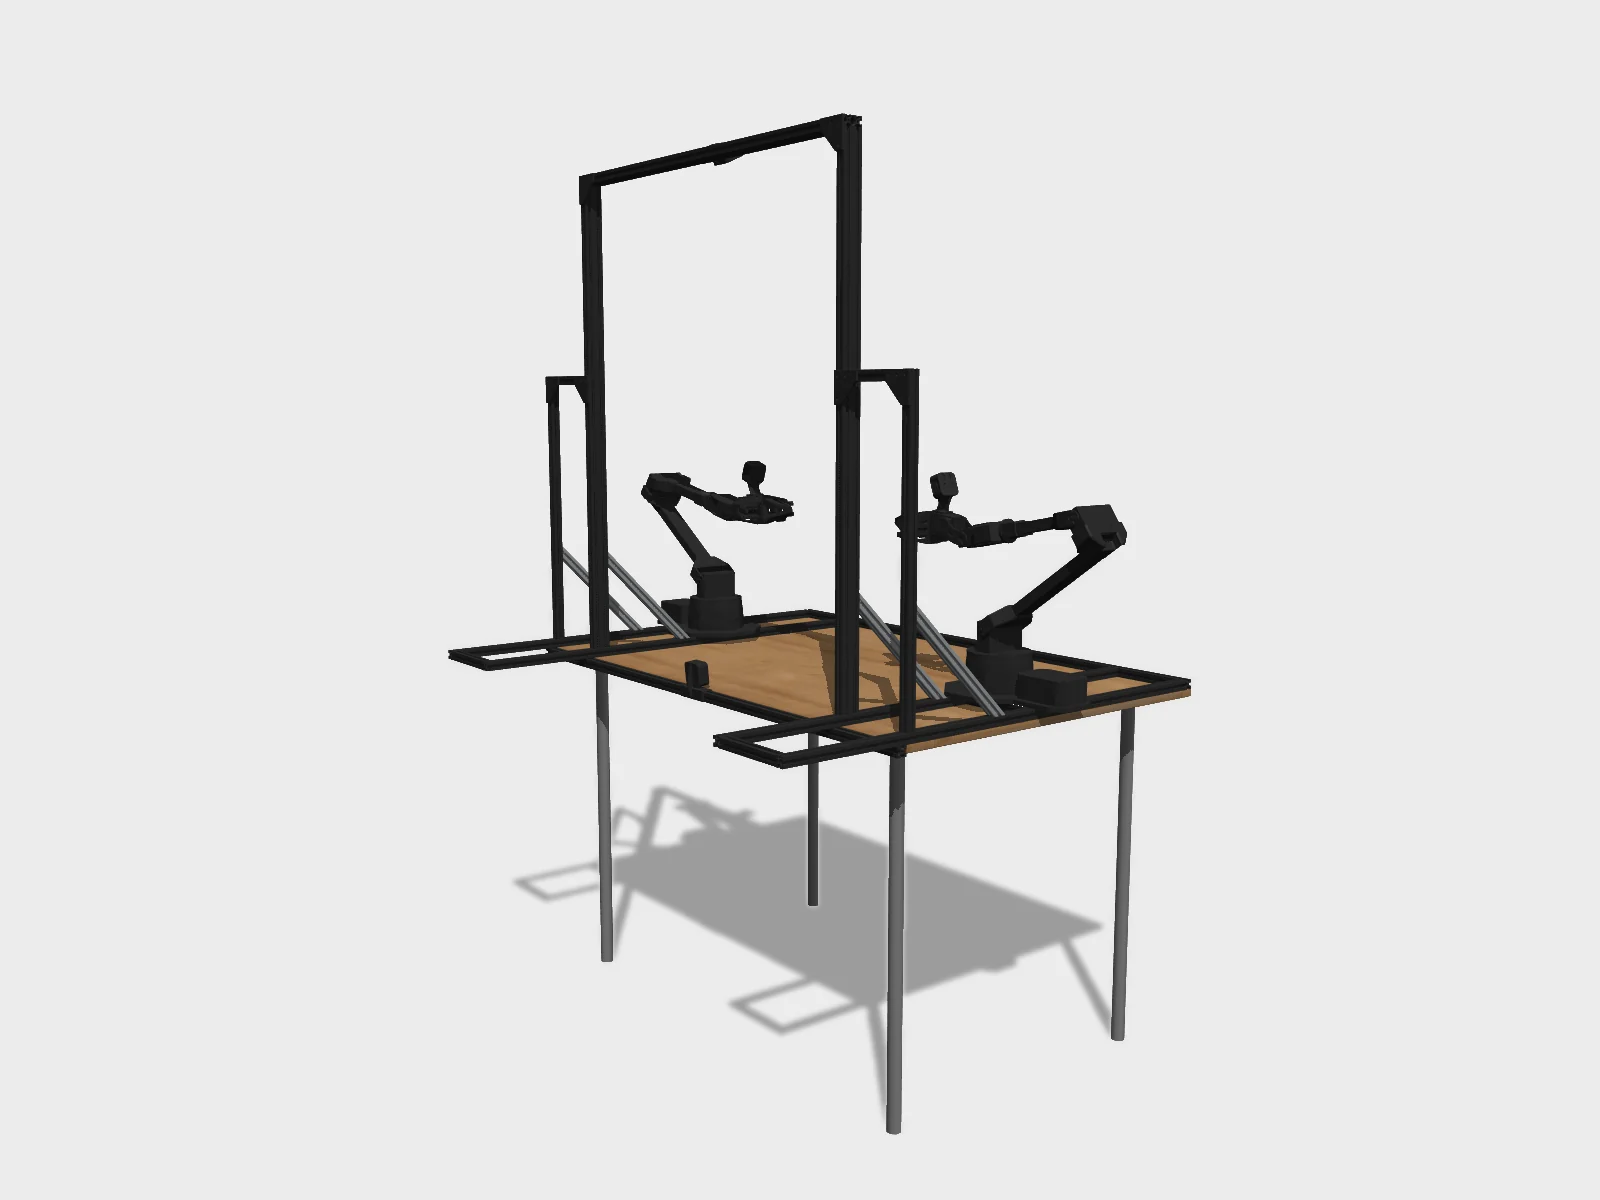
- Drawing
- /stanford/aloha
- Maker
- Stanford (Tony Zhao et al.)
- Country
- Stanford, US
- Package rev
- v0.1.0
- Level
- L2 Sim-verified
- Availability
- DIY
- Openness
- 85/100
- HW licence
- unknown
- Last checked
- 2026-09-25
- Size
- No sourced height, mass or DOF yet
Original repo last pushed Apr 2024; follow-ons (ALOHA 2, commercial kits) exist. Hardware assembly guide is a Google Doc. MIT covers the aloha and act code only; the hardware (Trossen arms) is sold under Trossen's terms and the printed parts have no stated license, so hw is left undeclared.
Configure
Saved in the URL. Share the link to share the build.Source
One cart across 2 vendors · prices in USD as listedStanford (Tony Zhao et al.) sells this robot. Buying from the maker funds the people who opened the design. Lines they stock are listed first below.
34 lines · 55 parts · 7 without an offer in US · 0/34 lines sourced in 2+ regions (L3 gate)
| # | Part | Category | Qty | Unit | Line | Offer |
|---|---|---|---|---|---|---|
Trossen RoboticsMaker2 lines · $17,983.80 | ||||||
| 1 | Trossen ViperX 300 Robot Arm 6DOF (puppet / follower arms) actuator.vx300s · MPN vx300s (Interbotix robot_model) · 1 alt | actuator | 2 | $5,695.95 | $11,391.90 | Trossen RoboticsTutorial link; now redirects to trossenrobotics.com/ai. The ViperX 300 S page is marked discontinued (checked 2026-09-25) |
| 2 | Trossen WidowX 250 Robot Arm 6DOF (master / leader arms) actuator.wx250s · MPN wx250s (Interbotix robot_model) | actuator | 2 | $3,295.95 | $6,591.90 | Trossen RoboticsTutorial link; now redirects to trossenrobotics.com/ai. The WidowX 250 S page is marked discontinued (checked 2026-09-25) |
Amazon25 lines · $1,305.56 + 4 unpriced | ||||||
| 3 | Standing desk, 48x30 in, black structure.desk | structure | 1 | $199.99 | $199.99 | AmazonLink from the ALOHA tutorial BOM |
| 4 | Aluminium extrusion bars, black, 10 pcs x 1220 mm (48 in) (yellow bars in frame CAD) structure.extrusion-1220 | structure | 1 | $99.99 | $99.99 | AmazonLink from the ALOHA tutorial BOM |
| 5 | Aluminium extrusion bars, black, 10 pcs x 1000 mm (39.4 in) (green bars) structure.extrusion-1000 | structure | 1 | $83.99 | $83.99 | AmazonLink from the ALOHA tutorial BOM |
| 6 | Aluminium extrusion bars, black, 4 pcs x 150 mm (5.9 in) (blue bars) structure.extrusion-150 | structure | 2 | $11.99 | $23.98 | AmazonLink from the ALOHA tutorial BOM |
| 7 | Corner bracket set, 20 sets, M5x8 (type 1 brackets) fastener.corner-bracket-m5 | fastener | 3 | $28.99 | $86.97 | AmazonLink from the ALOHA tutorial BOM |
| 8 | Corner bracket, black, L-4 with screws (type 2; supplies the drop-in T-nuts) fastener.l-bracket | fastener | 4 | $15.99 | $63.96 | AmazonLink from the ALOHA tutorial BOM |
| 9 | Rope crimping tool, 15 in, for 3/64 to 1/8 in cable other.rope-crimper | other | 1 | $35.97 | $35.97 | AmazonLink from the ALOHA tutorial BOM |
| 10 | Wire tensioner kit (60 m 1/16 in cable + M5 turnbuckles) structure.wire-tensioner | structure | 1 | $59.99 | $59.99 | AmazonLink from the ALOHA tutorial BOM |
| 11 | Logitech C922x Pro Stream webcam (2 wrist, 1 top, 1 front) sensor.c922x · MPN C922x | sensor | 4 | $98.35 | $393.40 | AmazonLink from the ALOHA tutorial BOM |
| 12 | Camera mount: 1/4 in screw C-clamp + tripod head (top camera) structure.camera-mount | structure | 1 | $21.99 | $21.99 | AmazonLink from the ALOHA tutorial BOM |
| 13 | USB hub (cameras only, max 2 cameras per hub) electronics.usb-hub | electronics | 2 | $19.99 | $39.98 | AmazonLink from the ALOHA tutorial BOM |
| 14 | Carbon fibre tube 10x12x500 mm (rubber-band hanger for the master arms) structure.cf-tube | structure | 1 | $16.98 | $16.98 | AmazonLink from the ALOHA tutorial BOM |
| 15 | Rubber bands other.rubber-band | other | 1 | $9.99 | $9.99 | AmazonLink from the ALOHA tutorial BOM |
| 16 | Cable ties (also trimmed for the velcro finger loop) other.cable-tie | other | 1 | $6.99 | $6.99 | AmazonLink from the ALOHA tutorial BOM |
| 17 | Electronics screwdriver set other.screwdriver-set | other | 1 | $14.99 | $14.99 | AmazonLink from the ALOHA tutorial BOM |
| 18 | Adhesive foam pad, 4x4x1/8 in, 10 pcs other.foam-pad | other | 4 | $9.99 | $39.96 | AmazonLink from the ALOHA tutorial BOM |
| 19 | M3 screws (M3x30 rail screws, M3x4 camera screw) fastener.m3-screws | fastener | 1 | $17.96 | $17.96 | AmazonLink from the ALOHA tutorial BOM |
| 20 | M2.5 screws (M2.5x10 handle bolts, M2.5x8 camera-mount screws) fastener.m25-screws | fastener | 1 | $13.59 | $13.59 | AmazonLink from the ALOHA tutorial BOM |
| 21 | Nuts 20S-M5 (T-nuts) fastener.m5-tnuts | fastener | 1 | $12.99 | $12.99 | AmazonLink from the ALOHA tutorial BOM |
| 22 | Bolts and nuts (assortment; the guide also calls for M5x14 bolts and M2.5/M3 nuts, source not itemised) fastener.bolts-nuts | fastener | 1 | $14.99 | $14.99 | AmazonLink from the ALOHA tutorial BOM |
| 23 | Gripping tape, 1 in wide other.grip-tape | other | 1 | $46.91 | $46.91 | AmazonLink from the ALOHA tutorial BOM |
| 24 | Replacement power supply able to power all 4 robots at once (stock ViperX supply can be unstable) power.psu | power | 1 | unpriced | — | AmazonTutorial link (resolves to ASIN B082NSVWJY); no price given |
| 25 | DC power cable to each robot (female end cut off, fitted with fork spade connectors) cable.dc-robot | cable | 4 | unpriced | — | AmazonTutorial link; no price given |
| 26 | Fork spade connectors (quantity not stated upstream) cable.fork-spade | cable | 1 | unpriced | — | AmazonTutorial link; no price given |
| 27 | Micro-B to USB-A cable, 10 ft (replaces the short stock cable; one per robot implied, extensions do not work) cable.usb-microb-10ft | cable | 4 | unpriced | — | AmazonTutorial link (ASIN B004C4WEVI); no price given |
No offer in this region7 lines · unpriced | ||||||
| 28 | Zip ties other.zip-tie | other | 1 | unpriced | — | No offer found yet |
| 29 | Hot glue gun other.hot-glue | other | 1 | unpriced | — | No offer found yet |
| 30 | FDM 3D printer and filament (BOM gives ~$300) other.fdm-printer | other | 1 | unpriced | — | No offer found yet |
| 31 | Metal file set (post-processing prints, fitting sliders) other.metal-files | other | 1 | unpriced | — | No offer found yet |
| 32 | WD-40 (lubricating the gripper rail) other.wd40 | other | 1 | unpriced | — | No offer found yet |
| 33 | Wood screws (L-brackets to desk) fastener.wood-screws | fastener | 1 | unpriced | — | No offer found yet |
| 34 | Linux PC with at least 6 USB3 ports (4 robots direct, 2 for camera hubs); 'heavy-duty' recommended compute.pc | compute | 1 | unpriced | — | No offer found yet |
| Cart total · US | 55 | $19,289.36 | 11 lines unpriced, not in total | |||
Fabricate
Planned for a 256 mm bed- Fabricated parts
- 25
- Print time (sum)
- —
- Material (sum)
- —
- Plates · estimate
- —
No plate estimate: the package does not list grams per part yet, and we will not guess them. Slice the source files for your 256 mm bed.
| Part | Process | Material | Qty | h / part | g / part | Profile |
|---|---|---|---|---|---|---|
handle_lower (master handle) printed.handle-lower | FDM | PLA | 2 | — | — | Cura; PLA (ABS also works); supports on; infill 40-80%; increased wall line count and top/bottom layers for rigidity; orientation per the printing doc |
handle_upper (master handle) printed.handle-upper | FDM | PLA | 2 | — | — | Cura; PLA (ABS also works); supports on; infill 40-80%; increased wall line count and top/bottom layers for rigidity; orientation per the printing doc |
lever1 (backdriving unit) printed.lever1 | FDM | PLA | 2 | — | — | Cura; PLA (ABS also works); supports on; infill 40-80%; increased wall line count and top/bottom layers for rigidity; orientation per the printing doc |
lever2 (backdriving unit) printed.lever2 | FDM | PLA | 2 | — | — | Cura; PLA (ABS also works); supports on; infill 40-80%; increased wall line count and top/bottom layers for rigidity; orientation per the printing doc |
slider (backdriving unit, rides on the gripper rail) printed.slider | FDM | PLA | 4 | — | — | Cura; PLA (ABS also works); supports on; infill 40-80%; increased wall line count and top/bottom layers for rigidity; orientation per the printing doc |
rotor (backdriving unit) printed.rotor | FDM | PLA | 2 | — | — | Cura; PLA (ABS also works); supports on; infill 40-80%; increased wall line count and top/bottom layers for rigidity; orientation per the printing doc |
rotor_arm (backdriving unit) printed.rotor-arm | FDM | PLA | 4 | — | — | Cura; PLA (ABS also works); supports on; infill 40-80%; increased wall line count and top/bottom layers for rigidity; orientation per the printing doc |
finger1 (puppet gripper) printed.finger1 | FDM | PLA | 2 | — | — | Cura; PLA (ABS also works); supports on; infill 40-80%; increased wall line count and top/bottom layers for rigidity; orientation per the printing doc |
finger2 (puppet gripper) printed.finger2 | FDM | PLA | 2 | — | — | Cura; PLA (ABS also works); supports on; infill 40-80%; increased wall line count and top/bottom layers for rigidity; orientation per the printing doc |
cam_mount (wrist camera) printed.cam-mount | FDM | PLA | 2 | — | — | Cura; PLA (ABS also works); supports on; infill 40-80%; increased wall line count and top/bottom layers for rigidity; orientation per the printing doc |
cam_mount_2 (front camera) printed.cam-mount-2 | FDM | PLA | 1 | — | — | Cura; PLA (ABS also works); supports on; infill 40-80%; increased wall line count and top/bottom layers for rigidity; orientation per the printing doc |
Assemble
Every step ends in a check- Steps
- 23
- Subassemblies
- 9
- Hands-on time (sum)
- —
- Critical path
- —
- Your progress · this device
- —
23 steps have no time estimate; times above are lower bounds.
Steps, in build order
- Fabrication01
Print the 25 ALOHA parts
Download the STLs from the Drive folder (file names are `(quantity)part_name.stl`) and print in PLA with supports on, 40-80% infill and extra walls/top/bottom layers, using the orientations shown in the 3D printing doc. File or sand holes so moving parts turn freely.
CHECKYou have 25 pieces matching the quantities in the file names, and each slider slides freely along a removed WidowX gripper rail.- Parts in
- handle_lower (master handle)printed.handle-lower
- handle_upper (master handle)printed.handle-upper
- lever1 (backdriving unit)printed.lever1
- lever2 (backdriving unit)printed.lever2
- slider (backdriving unit, rides on the gripper rail)printed.slider
- rotor (backdriving unit)printed.rotor
- rotor_arm (backdriving unit)printed.rotor-arm
- finger1 (puppet gripper)printed.finger1
- finger2 (puppet gripper)printed.finger2
- cam_mount (wrist camera)printed.cam-mount
- cam_mount_2 (front camera)printed.cam-mount-2
- FDM 3D printer and filament (BOM gives ~$300)other.fdm-printer
- Tools
- FDM printer (~$300 class), Ultimaker Cura, Metal file set
- Torque
- —
- Time
- —
- After
- Start
- Source
- docs.google.com
- Electrical02
Rewire robot power to the shared supply
Safety · human-verified requiredThe tutorial replaces the stock ViperX supplies with one supply that powers all four robots. Cut the female end off each of the 4 DC cables and fit fork spade connectors, then connect them to the supply terminals as its manual instructs. Mains wiring: do this unplugged and close the terminal cover before power-on.
CHECKWith the supply switched on and no robot connected, each barrel plug reads the supply voltage with the same polarity as the stock adapter, and nothing gets warm.This step can hurt a person or ruin parts. Its instructions need sign-off by a human who has done it before relying on them. Stop and ask if anything differs from what you see.
- Parts in
- Replacement power supply able to power all 4 robots at once (stock ViperX supply can be unstable)power.psu
- DC power cable to each robot (female end cut off, fitted with fork spade connectors)cable.dc-robot
- Fork spade connectors (quantity not stated upstream)cable.fork-spade
- Tools
- Wire stripper, Crimp tool, Digital multimeter
- Torque
- —
- Time
- —
- After
- Start
- Source
- docs.google.com
- Software03
Install ROS, Interbotix and the aloha package
Install ROS and the Interbotix X-series arm software per Trossen's docs (creates `~/interbotix_ws`). Clone this repo into `~/interbotix_ws/src`, run `source /opt/ros/noetic/setup.sh && source ~/interbotix_ws/devel/setup.sh`, `sudo apt-get install ros-noetic-usb-cam && sudo apt-get install ros-noetic-cv-bridge`, then `catkin_make` in `~/interbotix_ws`. In `interbotix_xs_modules/arm.py`, function `publish_positions`, change `self.T_sb = mr.FKinSpace(...)` to `self.T_sb = None` to avoid per-step FK latency.
CHECK`catkin_make` finishes without errors and `rospack find aloha` prints the package path.- Parts in
- Linux PC with at least 6 USB3 ports (4 robots direct, 2 for camera hubs); 'heavy-duty' recommendedcompute.pc
- Tools
- Ubuntu 20.04 + ROS 1 Noetic (tested per README)
- Torque
- —
- Time
- —
- After
- Start
- Source
- github.com
- Frame04
Build the frame on the desk
Safety · human-verified requiredFollow the Fusion 360 assembly (yellow 120 cm, green 100 cm, blue 15 cm bars). Place the blue 15 cm bar 25 cm from the table edge and the horizontal bar 80 cm above the tabletop. The highlighted bar meets the green horizontal bar outside the table edge. Secure the frame to the desk with L-brackets and wood screws. Tip-over risk: secure the frame to the table while building it.
CHECKMeasured 25 cm and 80 cm positions are correct, and pushing the top of the frame does not rock the desk.This step can hurt a person or ruin parts. Its instructions need sign-off by a human who has done it before relying on them. Stop and ask if anything differs from what you see.
- Parts in
- Standing desk, 48x30 in, blackstructure.desk
- Aluminium extrusion bars, black, 10 pcs x 1220 mm (48 in) (yellow bars in frame CAD)structure.extrusion-1220
- Aluminium extrusion bars, black, 10 pcs x 1000 mm (39.4 in) (green bars)structure.extrusion-1000
- Aluminium extrusion bars, black, 4 pcs x 150 mm (5.9 in) (blue bars)structure.extrusion-150
- Corner bracket set, 20 sets, M5x8 (type 1 brackets)fastener.corner-bracket-m5
- Corner bracket, black, L-4 with screws (type 2; supplies the drop-in T-nuts)fastener.l-bracket
- Nuts 20S-M5 (T-nuts)fastener.m5-tnuts
- Wood screws (L-brackets to desk)fastener.wood-screws
- Tools
- Allen keys, Tape measure
- Torque
- —
- Time
- —
- After
- Start
- Source
- a360.co
- Software05
Create the aloha conda environment and install ACT
`conda create -n aloha python=3.8.10`, `conda activate aloha`, then pip install torch, torchvision, pyquaternion, pyyaml, rospkg, pexpect, `mujoco==2.3.7`, `dm_control==1.0.14`, opencv-python, matplotlib, einops, packaging, h5py, ipython. Clone tonyzhaozh/act and run `cd act/detr && pip install -e .`.
CHECK`python -c "import mujoco, dm_control, detr"` succeeds inside the aloha env.- Parts in
- Linux PC with at least 6 USB3 ports (4 robots direct, 2 for camera hubs); 'heavy-duty' recommendedcompute.pc
- Tools
- —
- Torque
- —
- Time
- —
- After
- 03
- Source
- github.com
- Electrical06
Connect the 4 arms and bind fixed serial ports
Safety · human-verified requiredPlug each robot directly into the PC (no hub, no extension) and power it on. In Dynamixel Wizard 2 set Protocol 2.0, all ports, 1000000 bps, ID range 0-10 and scan. Then, per arm, get the FTDI serial with `udevadm info --name=/dev/ttyUSB0 --attribute-walk | grep serial` and add `SUBSYSTEM=="tty", ATTRS{serial}=="<serial>", ENV{ID_MM_DEVICE_IGNORE}="1", ATTR{device/latency_timer}="1", SYMLINK+="ttyDXL_master_right"` (and puppet_right, master_left, puppet_left) to `/etc/udev/rules.d/99-fixed-interbotix-udev.rules`; apply with `sudo udevadm control --reload && sudo udevadm trigger`. Arms collapse when torque is off: support them by hand.
CHECKThe Wizard scan shows 4 devices with 9 motors each, and `ls /dev/ttyDXL*` lists all four symlinks.This step can hurt a person or ruin parts. Its instructions need sign-off by a human who has done it before relying on them. Stop and ask if anything differs from what you see.
- Parts in
- Trossen ViperX 300 Robot Arm 6DOF (puppet / follower arms)actuator.vx300s
- Trossen WidowX 250 Robot Arm 6DOF (master / leader arms)actuator.wx250s
- Micro-B to USB-A cable, 10 ft (replaces the short stock cable; one per robot implied, extensions do not work)cable.usb-microb-10ft
- Tools
- —
- Torque
- —
- Time
- —
- Source
- github.com
- Master arms (WidowX)07
Install handles on the two WidowX (master) arms
Fit handle_lower and handle_upper to each WidowX with 4 M2.5 nuts and M2.5x10 bolts. Enlarge the holes with a drill if the bolt does not pass; two diagonal screws may be enough, four is more secure.
CHECKThe handle does not twist or rock on the wrist when you pull on it.- Parts in
- Trossen WidowX 250 Robot Arm 6DOF (master / leader arms)actuator.wx250s
- handle_lower (master handle)printed.handle-lower
- handle_upper (master handle)printed.handle-upper
- M2.5 screws (M2.5x10 handle bolts, M2.5x8 camera-mount screws)fastener.m25-screws
- Bolts and nuts (assortment; the guide also calls for M5x14 bolts and M2.5/M3 nuts, source not itemised)fastener.bolts-nuts
- Tools
- Drill, Allen keys
- Torque
- —
- Time
- —
- After
- 01
- Source
- docs.google.com
- 08
Assemble the backdriving units
Per unit: lever1, lever2, 2 sliders, 1 rotor, 2 rotor_arms. Check first that both sliders slide easily on the removed gripper rail and file them if not. Round or enlarge holes as needed so the linkage moves freely. Trim a cable tie for the velcro finger loop and hot-glue it to the lever.
CHECKThe assembled unit matches the front/back/side photos and the linkage moves end to end without sticking.- Parts in
- lever1 (backdriving unit)printed.lever1
- lever2 (backdriving unit)printed.lever2
- slider (backdriving unit, rides on the gripper rail)printed.slider
- rotor (backdriving unit)printed.rotor
- rotor_arm (backdriving unit)printed.rotor-arm
- Cable ties (also trimmed for the velcro finger loop)other.cable-tie
- Hot glue gunother.hot-glue
- Metal file set (post-processing prints, fitting sliders)other.metal-files
- Tools
- Allen keys, Metal file set, Hot glue gun
- Torque
- —
- Time
- —
- After
- 01
- Source
- docs.google.com
- Puppet arms (ViperX)09
Mount printed fingers on the ViperX (puppet) grippers
Check that the robot's sliders move freely on the gripper rail first; file the slider holes if they are too tight. Mount finger1/finger2 the same way as the OEM fingers with the two long screws supplied with the robot (a drill helps; it is expected to be hard). The straight edge faces up.
CHECKFingers open and close by hand with the clearance shown in the tutorial video and meet squarely when closed.- Parts in
- Trossen ViperX 300 Robot Arm 6DOF (puppet / follower arms)actuator.vx300s
- finger1 (puppet gripper)printed.finger1
- finger2 (puppet gripper)printed.finger2
- Metal file set (post-processing prints, fitting sliders)other.metal-files
- Tools
- Allen keys, Drill with hex bits
- Torque
- —
- Time
- —
- After
- 01
- Source
- docs.google.com
- Frame10
Stiffen the frame with crossing cables
Add diagonal crossing cables with the turnbuckles, attached through corner brackets or wound around the beam, and tension them so arm motion does not shake the cameras.
CHECKTop-camera image shows no visible shake while an arm moves quickly.- Parts in
- Wire tensioner kit (60 m 1/16 in cable + M5 turnbuckles)structure.wire-tensioner
- Corner bracket set, 20 sets, M5x8 (type 1 brackets)fastener.corner-bracket-m5
- Rope crimping tool, 15 in, for 3/64 to 1/8 in cableother.rope-crimper
- Tools
- Rope crimping tool, Allen keys
- Torque
- —
- Time
- —
- After
- 04
- Source
- docs.google.com
- Master arms (WidowX)11
Remove the OEM WidowX grippers
Remove the stock gripper from each WidowX. Keep every original screw, washer and T-nut and note where each came from; they are reused in the same places.
CHECKGripper rail and motor shaft are exposed and all removed hardware is bagged per arm.- Parts in
- Trossen WidowX 250 Robot Arm 6DOF (master / leader arms)actuator.wx250s
- Tools
- Allen keys
- Torque
- —
- Time
- —
- After
- 07
- Source
- docs.google.com
- Puppet arms (ViperX)12
Apply grip tape to the fingers
Apply a 1 cm piece at each fingertip (tape end at the tip of the triangle), then a ~10 cm strip wrapped around the straight edge first, then the other side, and trim. Optional: cover the whole finger with 5 cm, 3.5 cm and 2 cm pieces with no seam or overlap between the last two, which helps with round objects.
CHECKTape is tight with no lifted edges; the closed gripper picks up a thin plastic bag or candy wrapper from the table.- Parts in
- Gripping tape, 1 in wideother.grip-tape
- Tools
- —
- Torque
- —
- Time
- —
- After
- 09
- Source
- docs.google.com
- 13
Mount the wrist cameras
Remove the webcam stand (see the linked video), slide the camera into cam_mount and hold it with one M3x4 screw. Mount cam_mount to the robot with 4 M2.5x8 screws.
CHECKThe camera does not shift when the wrist is shaken by hand and its image shows the fingers.- Parts in
- Logitech C922x Pro Stream webcam (2 wrist, 1 top, 1 front)sensor.c922x
- cam_mount (wrist camera)printed.cam-mount
- M2.5 screws (M2.5x10 handle bolts, M2.5x8 camera-mount screws)fastener.m25-screws
- M3 screws (M3x30 rail screws, M3x4 camera screw)fastener.m3-screws
- Tools
- Allen keys
- Torque
- —
- Time
- —
- After
- 09
- Source
- docs.google.com
- Policy14
Train and evaluate ACT
Sim sanity check first: `python3 record_sim_episodes.py --task_name sim_transfer_cube_scripted --dataset_dir <dir> --num_episodes 50`, then `python3 imitate_episodes.py --task_name sim_transfer_cube_scripted --ckpt_dir <ckpt dir> --policy_class ACT --kl_weight 10 --chunk_size 100 --hidden_dim 512 --batch_size 8 --dim_feedforward 3200 --num_epochs 2000 --lr 1e-5 --seed 0`; add `--eval` to evaluate. For real data train at least 5000 epochs or 3-4x past the loss plateau.
CHECKSim evaluation success is around 90% for transfer cube (around 50% for insertion), per the ACT README.- Parts in
- —
- Tools
- NVIDIA GPU
- Torque
- —
- Time
- —
- After
- 05
- Source
- github.com
- Master arms (WidowX)15
Mount the backdriving unit on motor 9
Safety · human-verified requiredConnect with Dynamixel Wizard, select the 9th motor (gripper), torque it on and set Position to 180 by dragging the red line. Mount the backdriving unit to the shaft using its left and right holes.
CHECKWith the motor at 180 the shaft holes line up with the tutorial photo and the unit sits flush on both holes.This step can hurt a person or ruin parts. Its instructions need sign-off by a human who has done it before relying on them. Stop and ask if anything differs from what you see.
- Parts in
- Trossen WidowX 250 Robot Arm 6DOF (master / leader arms)actuator.wx250s
- Tools
- Allen keys, Dynamixel Wizard 2
- Torque
- —
- Time
- —
- Source
- docs.google.com
- 16
Refit the gripper rail with M3x30 screws
On each side: M3x30 screw, a nut as washer, through the hole, a second nut to secure it; then another nut and the original T-nut so the screw is flush with the T-nut. Slide the rail through T-nut, slider, slider, T-nut and tighten the nuts at both ends. A little WD-40 on the rail helps.
CHECKThe rail does not move when pushed, and both sliders run along it with no binding.- Parts in
- M3 screws (M3x30 rail screws, M3x4 camera screw)fastener.m3-screws
- Bolts and nuts (assortment; the guide also calls for M5x14 bolts and M2.5/M3 nuts, source not itemised)fastener.bolts-nuts
- WD-40 (lubricating the gripper rail)other.wd40
- Tools
- Allen keys
- Torque
- —
- Time
- —
- After
- 15
- Source
- docs.google.com
- 17
Test backdriving
Torque off motor 9 in Dynamixel Wizard and move the finger loop.
CHECKThe gripper motor backdrives easily through its full travel, as in the tutorial video.- Parts in
- —
- Tools
- Dynamixel Wizard 2
- Torque
- —
- Time
- —
- After
- 16
- Source
- docs.google.com
- Frame18
Mount the WidowX and ViperX arms to the frame
Mount each WidowX with two M5x14 bolts into drop-in T-nuts (position is up to you). Mount each ViperX with three M5x14 bolts into drop-in T-nuts, bolt 1 into the 15 cm bar; position matters here and washers may be needed. Mark the workspace centre with a 15x1 cm white tape at the intersection of the robot-base line and the table centre line.
CHECKNo arm base moves when the arm is pushed at full reach, and the white tape sits on both reference lines.- Parts in
- Trossen WidowX 250 Robot Arm 6DOF (master / leader arms)actuator.wx250s
- Trossen ViperX 300 Robot Arm 6DOF (puppet / follower arms)actuator.vx300s
- Bolts and nuts (assortment; the guide also calls for M5x14 bolts and M2.5/M3 nuts, source not itemised)fastener.bolts-nuts
- Corner bracket, black, L-4 with screws (type 2; supplies the drop-in T-nuts)fastener.l-bracket
- Tools
- Allen keys
- Torque
- —
- Time
- —
- Source
- docs.google.com
- 19
Mount the top and front cameras
Screw one webcam into the clamp mount and fix it to the middle of the horizontal bar. Remove the stand from another webcam, slot it into cam_mount_2 on a 15 cm bar held by 2 type-1 corner brackets at the centre of the table. Adjust both views to match the tutorial reference images. Run cameras through the USB hubs, max 2 per hub.
CHECKTop and front images match the reference views with the white tape near the image centre.- Parts in
- Logitech C922x Pro Stream webcam (2 wrist, 1 top, 1 front)sensor.c922x
- Camera mount: 1/4 in screw C-clamp + tripod head (top camera)structure.camera-mount
- cam_mount_2 (front camera)printed.cam-mount-2
- Aluminium extrusion bars, black, 4 pcs x 150 mm (5.9 in) (blue bars)structure.extrusion-150
- Corner bracket set, 20 sets, M5x8 (type 1 brackets)fastener.corner-bracket-m5
- USB hub (cameras only, max 2 cameras per hub)electronics.usb-hub
- Tools
- Allen keys
- Torque
- —
- Time
- —
- After
- 18
- Source
- docs.google.com
- 20
Rubber-band gravity compensation for the master arms
Hang each WidowX from the carbon fibre rod with rubber bands, zip ties and cable from the tensioner kit, as in the tutorial photo and video.
CHECKWith torque off, each master arm stays roughly where you leave it instead of dropping.- Parts in
- Carbon fibre tube 10x12x500 mm (rubber-band hanger for the master arms)structure.cf-tube
- Rubber bandsother.rubber-band
- Cable ties (also trimmed for the velcro finger loop)other.cable-tie
- Wire tensioner kit (60 m 1/16 in cable + M5 turnbuckles)structure.wire-tensioner
- Tools
- —
- Torque
- —
- Time
- —
- After
- 18
- Source
- docs.google.com
- Bring-up21
Limit puppet gripper current and bind camera ports
In Dynamixel Wizard select `[ID:009] XM430-W350` on each puppet arm, set `38 Current Limit` to `200` and save. Then add udev rules for the cameras (`SUBSYSTEM=="video4linux", ATTRS{serial}=="<serial>", ATTR{index}=="0", ATTRS{idProduct}=="085c", ... SYMLINK+="CAM_RIGHT_WRIST"`, likewise CAM_LEFT_WRIST, CAM_LOW, CAM_HIGH) and reload udev.
CHECKCurrent Limit reads 200 after re-reading both motors, and `/dev/CAM_*` shows all four camera symlinks.- Parts in
- Trossen ViperX 300 Robot Arm 6DOF (puppet / follower arms)actuator.vx300s
- Logitech C922x Pro Stream webcam (2 wrist, 1 top, 1 front)sensor.c922x
- Tools
- Dynamixel Wizard 2
- Torque
- —
- Time
- —
- Source
- github.com
- 22
First motion: bimanual teleoperation
Safety · human-verified requiredPut all 4 robots in their sleep positions and open the master grippers. Terminal 1: `roslaunch aloha 4arms_teleop.launch`. Terminals 2 and 3 (conda env aloha, in `aloha_scripts`): `python3 one_side_teleop.py right` and `python3 one_side_teleop.py left`. All robots rise to a teleop height; teleoperation starts when a master gripper is closed. Keep clear of the puppet arms. Before cutting power run `python3 sleep.py`.
CHECKThe launch prints no errors, and each puppet follows its master joint by joint with the gripper tracking the finger loop.This step can hurt a person or ruin parts. Its instructions need sign-off by a human who has done it before relying on them. Stop and ask if anything differs from what you see.
- Parts in
- —
- Tools
- —
- Torque
- —
- Time
- —
- Source
- github.com
- Data23
Record episodes
Set `DATA_DIR` and the task in `aloha_scripts/constants.py`, then `python3 record_episodes.py --dataset_dir <dir> --episode_idx 0`. Check with `python3 visualize_episodes.py --dataset_dir <dir> --episode_idx 0` and replay on the robot with `python3 replay_episodes.py ...`.
CHECKAn hdf5 file is written per episode and the visualisation shows all 4 camera streams and joint traces for the full episode length.- Parts in
- —
- Tools
- —
- Torque
- —
- Time
- —
- After
- 22
- Source
- github.com
Progress is stored in this browser only (localStorage). Nothing is sent anywhere.
Bring-up
Flash · calibrate · first policy- A
Flash firmware
TargetsInterbotix X-series arms: stock Dynamixel firmware (gripper motor ID 9 is XM430-W350 on the ViperX), Robot USB interface (FTDI serial; udev bound to /dev/ttyDXL_*)
Repogithub.com/Interbotix/interbotix_ros_manipulators
Stock servo firmware; control runs through the Interbotix ROS driver (`interbotix_xsarm_control`, robot_model wx250s for masters and vx300s for puppets) launched by `4arms_teleop.launch` with per-arm mode configs in `config/`.
- B
Calibrate
CalibrationNo joint calibration step upstream. Set Dynamixel Wizard to Protocol 2.0 / 1,000,000 bps, set puppet gripper (ID 9) Current Limit to 200, and adjust the gripper open/close constants in aloha_scripts/constants.py (MASTER_/PUPPET_GRIPPER_POSITION_* and _JOINT_*) if your printed fingers differ.Log the output. It goes in your build report.
- C
First policy
- Bimanual cube transfer (simulation, human demos)LeRobot ACT source
- Bimanual peg insertion (simulation, human demos)LeRobot ACT source
Try the policy in the browser sim before it touches hardware. Keep a hand near the power switch the first time a policy runs on the real robot.
Report your build
Moves ALOHA toward L4 · BuiltA build report is the only thing that proves a package works. It raises the level, puts a point on the map, and tells the Foreman which steps to rewrite.
Level gate
Holds L2 · evidence, not confidence- L0Indexed
Known to exist. Atlas page only.
- 6 sources on record(met)
- L1Compiled
Package validates against the spec; every fact has a source.
- Build package compiled(met)
- 19 sources across robot and package(met)
- L2Sim-verified
Loads in browser and GPU sim, mass within tolerance of the BOM, holds a stand. Unlocks .training.
- URDF/MJCF is public(met)
- Sim load, mass tolerance and stand are checked on .training(checked elsewhere)
- L3Sourced
Every BOM line resolves to a live offer in at least two regions. Unlocks the one-click cart.
- 0/34 BOM lines have offers in 2+ regions(not met)
- L4Built
At least one community build report with photos and bring-up logs. Unlocks Build it as the main action.
- 0 reviewed build reports(not met)
- Review feed unreachable at last refresh; count is registry-only(checked elsewhere)
- L5Certified
The robot's maintainer signs the package. Unlocks certified teams and kit sales.
- Maintainer signature not recorded(not met)
Levels are cumulative and set by the registry from reviewed evidence. This panel shows what can be measured from the package today.
Same robot, other verbs
- Know ithumanoidrobots.systems/stanford/aloha
- Build itpartialhumanoidrobot.build/stanford/alohaThe original build uses Trossen ViperX 300 / WidowX 250 6DOF arms, which Trossen has discontinued. Trossen now sells ALOHA kits (Stationary, Mobile, Solo) on newer hardware.
- Train ithumanoidrobots.training/stanford/aloha
- Find its crewhumanoidrobots.team/stanford/aloha
- See it on the maphumanoidrobots.earth/stanford/aloha